Seed starting time means dozens of little pots. Newspaper pots that need making, or plastic pots that need cleaning. And pots that mean storing later on. Soil blocks are a way that you can eliminate all those pots and the work that goes along with them.
Soil blocks are, well, blocks of soil. Small, compressed blocks of soil in which seeds are started to be more precise. With soil blocks, no pots are used. A tool, appropriately called a Soil Block Maker, is used to make the soil block.
I liked the idea of making soil blocks to start seeds the minute I first heard of them. No pots meant I didn’t have all the work that goes along with them. And while I don’t sell seedlings, for those that do, this is both economical and good for the environment.
It is my understanding that soil blocks are better for plants as well. Plants do not get root bound like they do in a pot, and transplant shock is reduced.
There are air spaces between each block, and as the root hits this air, it will stop growing roots and concentrate its growth on leaves. In a pot, when the roots hit the pot, they begin to grow around the inside of the pot where they may become root bound, robbing strength from the plant.
A special blend of soil that stays together well is recommended for use with soil blocks; I used this mix.
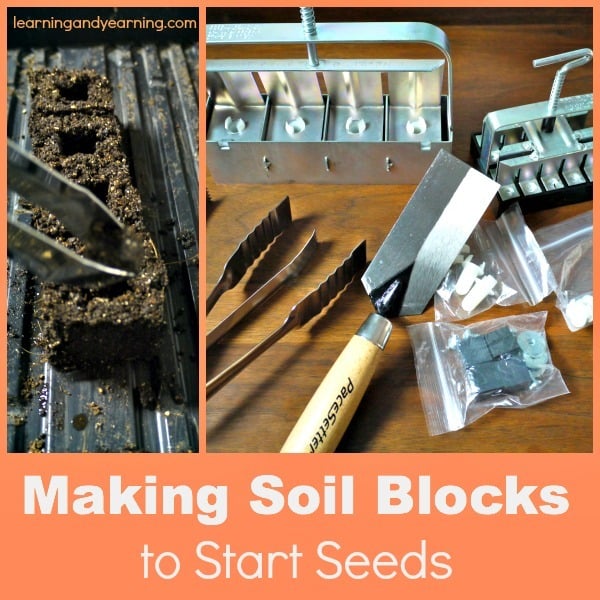
Two sizes of soil block makers were included in the kit I received – one to make 3/4″ blocks, and the other to make 2″ blocks. In addition, the kit included 2 sizes of tweezers for use in moving the blocks, a trowel, and pins to insert into the block maker to use to make indentations (which I’ll explain later).
Here’s what I did to make the soil blocks:
I emptied my bag of potting mix into a 5 gallon bucket, added water, and waited about an hour for the soil to absorb the water. The instructions say to add enough water to give it the consistency of peanut butter or porridge. It never looked like either to me; I found that it needed to be on the wet side, but not dripping wet.
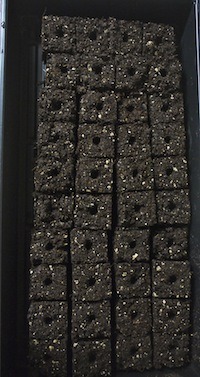
Soil Blocks
I then pushed my soil block maker into the soil, twisting as I pushed. Everything I read said that this takes a bit of practice at first to get consistently good soil blocks. I really struggled with this step and had to use my hands to fill the machine with soil.
I finally had some success when I moved the bucket from the sink to the floor, which allowed me to use more force to fill the machine with soil. This wasn’t easy on my hands, or my back and I can see why they also manufacture soil block makers with long handles. I would definitely recommend investing in these if you intend to make a lot of soil blocks.
The last step is to place the soil-filled machine onto a tray and depress the plunger to eject the blocks. Again, firm pressure while depressing the plunger is mandatory.
I’ve made approximately 20 dozen blocks at this point, and I would say that I’m just getting the hang of it.
The soil block maker automatically creates holes in each block to hold seeds. My kit came with 3 sizes of pins that are interchangeable. The 5/8″ pin is for small and medium size seeds, the 1″ pin is for large seeds. There is also a 3/4″ square pin included and this is where the soil block maker really get fun. If you start seeds in the 3/4″ soil block maker, you can then easily transplant them into a 2″ soil block which you’ve made using the 3/4″ square pin. All you do to transplant is to pick up the small block with the tweezers and set it right into the larger block. Nice!
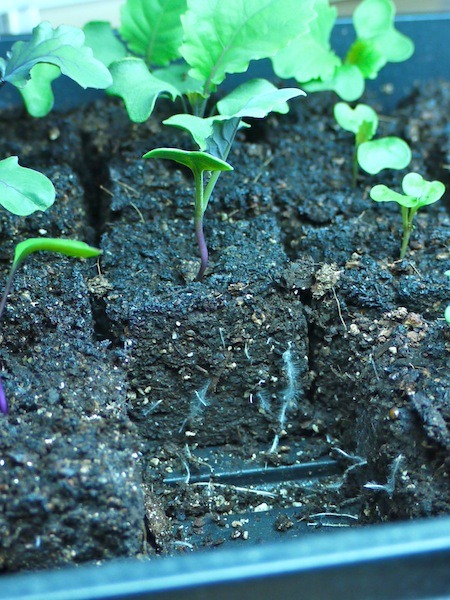
Notice the healthy roots that are forming.
I’ve really only used the 2″ soil block maker. I tried the 3/4″ but all I made was a mess. The instructions did say to sift the soil to make it finer first, which I did not do. I don’t really have anything on hand to use to sift it, and I really didn’t think I would use such small pots. They come in handy if you want to fit a lot of pots on a seed warming mat.
What I really would love to have is the larger 4″ soil block maker which you can make with a 2″ square indentation. Then I could easily transplant my 2″ pots into the 4″ pot.
Despite the initial problems making the pots, overall I like the soil block maker. My seedlings are looking nice and healthy, and transplanting into the garden will be a breeze.
Edit – February, 2017: I’ll be starting my 4th year of using soil blocks soon. While I struggled to make the pots the first year, I did finally catch on. There’s no secret trick; it’s just a matter of practice making perfect. I’ve found that the seedlings produced with the soil block are healthier than those grown in pots and I don’t plan to ever go back.